

🚀 Project Snapshot: The Bronze Backyard Upgrade
- 📍 Suitability: All Climates (UV Resistant & Snow Load Friendly)
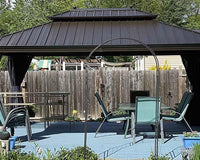
- 🛠️ The Build: Purple Leaf 10' x 14' Hardtop Gazebo (Bronze Finish)
- ⏱️ Timeframe: Weekend Project (Faster with a helper).
- 💡 Pro Tip: Use a power driver (carefully) instead of the manual Allen wrench to save hours.
- ✅ Key Result: A robust, rain-proof structure with integrated privacy and bug protection.
Note: This guide is based on a detailed walkthrough by the YouTube channel DIYTechnician. At Purple Leaf, we strive to "Accompany for Longer," and this tutorial perfectly demonstrates how our precision engineering makes DIY assembly achievable and durable.
📦 Phase 1: Preparation & Sorting (The "Before")
The journey from an empty patio to a shaded oasis begins with organization. As DIYTechnician points out, this backyard gazebo ships in multiple boxes.
- Sort by Number: Lay out all parts (A, L, B1, B2) so the labels are visible.
- The Foundation: The assembly starts by connecting Piece A to Piece L using the A1 fasteners.
- Orientation Matters: Pay close attention to the direction of the brackets—the chamfered part must face out because it is threaded for future connections.
Key Takeaway: Don't rush the unboxing. Grouping your fasteners (Number 1s, Number 9s) prevents confusion later.

🏗️ Phase 2: Framing & The Power Tool Hack
Erecting the frame requires connecting the heavy-duty aluminum posts.
- The Connection: Slide Piece I into B2, then connect to B1.
- The Hack: While the kit comes with manual tools, DIYTechnician shares a massive time-saver:
"Little pro tip here. I'm using a couple of different drivers here rather than the manual Allen wrench. Speeds things up a little bit."
Note: If using a drill, set the torque low to avoid stripping the bolts.
Once the main pillars (C1, C2) and crossbeams are up, the structure begins to take shape. The triangular posts (3.93") provide the stability needed to withstand winds up to 40 mph.
🏠 Phase 3: The Roof (And the Critical "Loose Bolt" Trick)
Installing the galvanized steel double roof is often the most intimidating part of a Patio Gazebo build. However, the video highlights a specific technique to make the panels (V1-V5) slide in effortlessly.
The Secret:
When installing the roof panels into the tracks (Z pieces), do not fully tighten the brackets immediately.
- Leave it Loose: Remove or loosen the brackets temporarily to give yourself "wiggle room."
- Slide & Lock: Once the panel is seated in the crevice, re-attach the bracket and tighten.
- Overlap: Ensure Piece V4 overlaps correctly to ensure the water drainage system works effectively.

🛡️ Phase 4: Curtains & Netting (Comfort & Privacy)
A major advantage of this Purple Leaf model is the dual-track system.
- Inner Track: Install the Bug Netting first.
- Outer Track: Install the Privacy Curtains second.
Installation Trick:
When snapping the curtain buttons:
"Take the button, put the bottom on, and then snap it up over the top. Makes it a lot easier to kind of push the whole thing down."
The result is a fully enclosed space where you can block out the sun or keep insects at bay while maintaining airflow through the vented double roof.

💡 Frequently Asked Questions (FAQ)
Q1: How does this hardtop gazebo handle rain?
A: The roof features a sloped design and a built-in gutter system. Rainwater flows from the top, into the channels, and down the pillars, preventing pooling and keeping the area underneath dry.
Q2: Can I hang lights or a fan inside?
A: Yes! As mentioned in the video, there are built-in hooks (Piece 12) along the interior frame, perfect for hanging string lights, a ceiling fan, or decorations to customize your ambiance.
Q3: Is the assembly really 20% faster?
A: Compared to similar products, our streamlined instruction manual and labeled parts significantly reduce setup time. With a helper and a power drill (as suggested by DIYTechnician), it is a smooth weekend project.
Q4: What is the wind rating?
A: This model is engineered to withstand wind gusts up to 40 mph when properly anchored.
1 comment
Carol Gidner
Looking for someone to install a 12×14 purple leaf hardtop gazebo in 92078 zip code.