

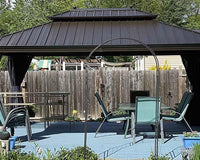
It can be very exciting and fulfilling to install an outdoor gazebo in your backyard. It not only adds elegance to the outdoor space but also serves as a functional retreat for relaxation and entertainment. This article will facilitate the assembly of the entire gazebo process by giving clear instructions on choosing the best spot, laying the foundation, and erecting it. Whether you're a DIY enthusiast or a novice to home projects, this comprehensive guide will provide you with all the practical advice needed to enhance your backyard with the beauty and charm of a well-installed gazebo. Start now and change your outdoor living space into something you have always dreamt of.
1: Planning and Preparation
Planning is crucial before starting physical work so that your hardtop gazebo installation goes smoothly.
Choosing Your Gazebo's Location
Pick a spot in your yard that is flat and doesn't collect water. Think about how sunny this spot gets during the day. If you like sun all day long while working out there, choose an area with lots of sunshine. If you prefer shade during part of the day, too, aim for shade. Try to find a place that's blocked from strong winds since these may damage your new gazebo.
Zoning Laws
It's important to check with your local government to see if there are any rules about building gazebos. They might have requirements about where you can put it or how big it can be.
Gathering Tools and Materials
Ensure you have all necessary tools such as hammer, drill, level, tape measure, and ladder, among others required for assembling the kit for your backyard gazebo; don't forget safety gear like gloves, goggles, or hard shoes while working on such projects so as to avoid accidents later on when building it hence you should put them on throughout before beginning construction project on it.

2: Laying the Foundation
Having a solid foundation means having something strong enough to withstand any weather condition all year round.
Choosing the Right Foundation Type
- Concrete Slab: Large or permanent gazebos would do well with a concrete slab as they are very strong and stable.
- Gravel Pad: For smaller gazebos, this is a good option since it drains water easily and doesn't require much work like making concrete does.
- Patio Stones: Aesthetically pleasing patio stones make fine foundations for medium-sized gazebos that are not hard to install.
Preparing the Ground
- Clear the Area: Get rid of any grass, rocks, or other debris from the site where your gazebo will be placed.
- Level the Ground: Use a shovel and rake to even out the space as much as possible.
- Measure Precisely: Based on how big your gazebo is going to be, mark out the dimensions of its base properly.
Laying Down Your Foundation
For Concrete Slabs:
- Build a wooden form to hold the concrete in place.
- Mix concrete according to the manufacturer's instructions and pour it into the form.
- Use a screed board and trowel to smooth the surface, and let it cure as recommended before proceeding.
For Gravel Pads:
- Lay down landscape fabric to prevent weeds from growing up through the gravel.
- Fill the area with gravel and pack it down firmly.
For Patio Stones:
- Place sand for stone bedding. Set stones using rubber mallet. Adjust each stone individually where needed by adding more sand.
By taking the time to properly lay a foundation, one can guarantee that their gazebo will not only be strong but can also avoid other problems like water damage or structural shifts.
3. Assembling the Base
With a solid foundation in place, you're ready to start assembling your patio gazebo from the ground up.
Laying Out Floor Joists
Once your gazebo's foundation is ready, you can start by laying out the floor joists. These are the horizontal beams that will support the flooring. Lay them out as per the gazebo's design, usually perpendicular to the base frame. It's crucial to space each joist evenly and ensure they're all parallel so that your gazebo has a stable and level floor.
Securing the Support Posts
Next up are the support posts. Place these upright at specific points around the base, following your gazebo's layout plan. They're vital because they support the entire structure above, including the roof. Before you attach them to the base, use a level to check that each post is standing straight up or "plumb." This ensures your gazebo will be well-balanced and sturdy.
Attaching the Floorboards
With the joists and posts in place, it's time to install the floorboards. Start from one edge and work across, laying the boards on top of the joists. Leave a small gap between the boards for expansion when the weather changes. Fix them down with screws, making sure the screws are flush with the wood for a neat finish. Once done, your gazebo will start to take shape with a solid and beautiful base.
4. Building the Frame
This part gives your metal hardtop gazebo its form and personality traits. It must be solid enough to resist weather conditions while remaining delicate enough for aesthetic reasons of a gazebo.
Vertical Posts Erection
- Carefully position the vertical posts onto the base at their designated spots. These posts are very important since they will carry all the weight from the roof on top of them.
- Ensure every post is genuinely vertical using a spirit level before securing.
- Attach either with bolts or long screws, depending on your gazebo's design and material.
Adding Horizontal Beams
- Next, attach horizontal beams to connect the top of the vertical posts. These beams will add structural integrity and define the upper edge of your gazebo's walls.
- Ensure that the beams are level all around; discrepancies here can lead to issues with fitting the roof later.
Bracing for Stability
- Position diagonal braces between posts and beams to provide additional stability – these are important in areas prone to strong winds or heavy snowing.
- Make sure each brace fits fairly tight and is connected with screws or nails for a more durable gazebo frame.

5. Roof Assembly and Shingles
The roof is not only a defining feature of your gazebo but also your primary shield against the elements. Proper assembly is crucial for both the aesthetic appeal and the longevity of your structure.
Assembling the Roof Trusses or Panels
- Start off by assembling/laying down pre-fabricated roof trusses or panels, which will form a pitched roof for your gazebo.
- Connect them to the top horizontal beam on your frame while spacing them evenly and securing each one properly.
- Ensure that the trusses are aligned correctly; misalignment can cause problems with the fit and finish of your roofing materials.
Attaching the Roofing Material
- Once the trusses are in place, it's time to attach the roofing material. This might be wooden panels, metal sheeting, or another type of covering specific to your kit.
- Start from the bottom edge of the roof and work your way upwards, overlapping materials as you go to ensure water runs off properly.
Installing Shingles for Weatherproofing
- If using shingles, begin at the lower edges of the roof and apply them in rows, moving upward toward the peak, ensuring each row overlaps the one below it.
- Use roofing nails to secure each shingle, and apply roofing adhesive where necessary to prevent wind uplift.
- At the peak, use ridge cap shingles to provide a neat finish and additional weather protection.
6. Finishing Touches and Customization
With the structure and roof in place, your gazebo is now taking shape. This stage involves adding features that will turn your gazebo into a cozy, inviting outdoor space.

Adding Side Panels or Screens
- Decide whether you want to add side panels for privacy, screens to keep out insects, or leave the sides open to allow for an unobstructed view and airflow.
- If installing panels or screens, carefully measure and install them between the posts, ensuring they fit snugly and are securely fastened.
Decorative Elements and Trim
- Add any trim work around the edges of the roof and at the tops and bottoms of the posts. This not only conceals joints and gaps but also gives the gazebo a polished look.
- Consider installing decorative brackets or corbels under the eaves for added style and architectural interest.
Staining or Painting Your Gazebo
- Select a stain or paint that complements your home's exterior and fits in with the surrounding landscape.
- Before applying, make sure all surfaces are clean, dry, and sanded if necessary for the best adherence.
- Apply the stain or paint with a brush, roller, or sprayer, depending on the product instructions and your preference.
Welcoming Your New Backyard Gazebo
And there you have it – your very own metal gazebo, standing proudly in your backyard. Erecting this sanctuary of solitude or hub of social gatherings can indeed be a rewarding experience. By following the steps outlined, from laying a steadfast foundation to applying those final decorative flourishes, you've not only built a structure but also created a space that's uniquely yours. As you look upon your handiwork, remember that this gazebo is more than just timber and nails; it's a testament to your dedication and a new chapter of countless memories waiting to unfold amidst its sheltering embrace. So, take a moment to appreciate your efforts – it's time to sit back, relax, and enjoy the many peaceful days and vibrant evenings your new outdoor retreat will host.
Read More
- Can I Install A Hardtop Gazebo On Grass?
- Comparing the Durability and Aesthetics of Hardtop Gazebos to Traditio
- Enhancing Outdoor Living: Exploring the Beauty and Versatility of Gaze
- Pergola Comparison | Louvered or Retractable for Outdoor Bliss
- Pergola Setup Guide | Secure Outdoor Structure Assembly
36 comments
Daniel
I just purchased a 12′ × 14′ sun room gazebo. Can you email me the installation documents so I can read from cover to cover before it arrives,
Thanks
Waldemar Piotrowski
Where I can find 12×20 solarium gazebo assembly instruction ? Original one was missing
Frank Luera
Did not receive assembly manual for 12 × 20 gazebo hardtop
dawn
please email me the 12×16 hardtop patio gazebo instructions. thank you!
Susan
Please email me the 12 X 28 gazebo PDF. Thank you
Eli
Here a link to a 10×14.
Gonna try make it work for a 10×12.
Shity site to not have a PDF anywhere.
https://images.thdstatic.com/catalog/pdfImages/ce/ce4d57b6-5d81-4890-bce2-14f371c81c4f.pdf
STEPHEN P. TYLER
Yes!!!
Add me to the list of people that would also like to have a copy of the installation instructions for the 12*14 HARDTOP GAZEBO.
If anyone reads this and has a set of installation instructions, I would love to purchase a copy of said instructions.
Thank you,
SP Tyler
stephtyler@ sbcglobal.net
Tom
Bad experience with delivery and product. First, one box was missing from the original delivery that delayed our completion by more than two weeks. Second, we paid extra for the “luxury” version that included curtains and upgraded screens. Unfortunately one the curtains does not fit and is too long on both sides and, worst of all, the screens don’t align with the curtains so the zippers are all out of place when you align the curtain eyelets with the screen hooks to secure to the posts. So, Purple leaf has shoddy attention to detail when sending out their orders resulting in additional expenses to order the correct curtain and doing my own sewing to realign the screen hooks with the posts.
Dan
need assembly instruction for 10×12 hard top gazebo,Please thank you
Jamie Norris
Where can I find instructions on how to properly uninstall the gazebo and then re-install as needed?
Adriana
We are trying to get a permit approved for your 10×10 hardtop gazebo. Can you please provide the installation instructions?
Lamont Holmes
Please send me instructions for Model #LS04JJG1214 14ft X12ft gazebo from lowes
Dave S
Help!! It seems you don’t post answers? There were no assembly instructions for my 12 × 24 Gazebo!!!
Richard Reimer
Where can I download instructions PDF please to assemble the PURPLE LEAF 12′ × 16′ Outdoor Hardtop Gazebo Double Top Patio Screen House Aluminum Solarium Backyard Sun Room with Detachable Windows, Grey Frame?
Roger Garber
I need installation instructions for a 14×20 purple leaf gazebo
Libbey
I need the assembly instructions for the 12’ x 14’ PURPLE LEAF Sunroom Hardtop Gazebo Solarium Galvanized Steel Double Roof All-Weather Aluminum Outdoor Screen House
Lee Abel
I am going to buy 14′×24′ gazebo fron your compay via Amazon. What are the dimensions of those 6 mounting posts. Here in the US, it is required a permit and it is require to mount those 6 supporting posts to permanent structures (6 concrete posts) which are burried 4 feet deep into the ground below patio. I am making patio now and need to dig 4 feet deep holes to pure the concrete before laying the paver for the patio.
Paula Alves
Please provide instructions for 12×16 double roof w/24 lights gazebo.
Tony
Contact them and they will send you a downloadable manual. Or Venmo me directly @Tonyldgjr and I’ll email you ASAP. $3.00 will cover my time and effort.
Tony D.
Received 5 boxes for my 13 x13 galvanized double roof gazebo. Where are the instruction?
Carie
Could I please get pdf instructions or something for 12×20 gazebo
Carie
Could I please get pdf instructions or something for 12×20 gazebo
kevin
opened my 12×20 gazebo boxes and found no instructions. really helpful if I can get the instruction manual
D Wood
We have purchased a 13′ × 15′ Permanent Gazebo with Metal Roof. Looking forward to installing it. We are looking for the installation instructions. We purchased the gazebo (13′×15′)
Claudine Raby
Yelp! We need the instruction for monday 12. It is 12×16 sunroom with double roof. No: LGMF1634A. Thank you
raby.claudine@videotron.ca
Tony
The only thing mentioned here is installing it to a concrete slab, gravel bed, or patio stones. Is there a recommendation regarding installing it on a deck?
Robert Decker
where is the setup guide i am sending back
Adam
How are there 10 people, and now me, requesting installation instructions and still no posted instructions from this company?
Anthony Sperrazza
Where can I download a PDF or MS-Word document containing installation instructions for my 12×24 Outdoor Hardtop Gazebo for Garden Bronze Double Roof Aluminum, SKU# ZYMHS1224-48L . I want to be able to print off a few pages at a time as we put this together and nor ruin the original in one of the eight boxes. Also, I can’t seem to login to the account which I tried setting up using my email addy aps10314@gmail.com
David
We have purchased a 13′ × 15′ Permanent Gazebo with Metal Roof. Looking forward to installing it. We are looking for the installation instructions. We purchased the gazebo (13′×15′) and the grill gazebo. Are there instructions we can download? The gazebos were delivered in 10 boxes.
douglas sylliaasen
I would like to download installation instructions PDF if possible please. Please forword to email so we can plan installation for what we have purchased.
John Eldon Magee
Our contractor wants the installation instructions for the 13′ × 15′ Permanent Gazebo with Metal Roof. Please advise how to get along with the listing of all the parts. Thank you.
Kevin
Which of the 6 boxs for the 12×20 hardtop gazebo includes the instructions?
Bo Green
Like others have requested I would like to download the assembly instructions. My contractor wants to see the assembly instructions before giving me a price. I won’t purchase before I have the full estimate (price + assembly). Please expedite this request and provide information as soon as possible. I’m looking at the 12 × 20 hardtop (listed on Home Depot website as model # PPLMHS1220DBWL ).
Dean
How hard is it to get a copy of the assembly instructions online to download? I have a 12 x16 gazebo. Your web site should already have it listed for easy download!
Noel
Where can I download instructions to assemble the 12’ x 14’ PURPLE LEAF Sunroom Hardtop Gazebo Solarium Wood Grain Galvanized Steel Double Roof All-Weather Aluminum Outdoor Screen House? I purchased it online from Lowe’s and it was shipped to me by Purple Leaf.