

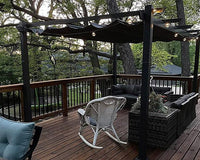
Adding a stylish and practical aluminum pergola to your yard is a great way to create a shady, cozy spot for hanging out or entertaining friends and family. But to make sure your pergola lasts a long time and stays looking its best, you need to put it upright and stay safe while doing it. In this easy-to-follow guide, we'll take you through the whole process of installing an aluminum pergola from start to finish. We'll cover everything from planning and getting ready to add the finishing touches. Along the way, we'll also point out important safety tips to keep in mind, so you and your helpers can stay out of harm's way while you build an awesome new feature for your outdoor space.
Safety First: Preparing to Install Your Pergola
Before we jump into putting up your new aluminum pergola, let's talk safety. It's the most important part of this project. A few smart moves before you start can keep you out of harm's way and make sure your pergola-building adventure doesn't take an unexpected turn.
Dress for Success
Do the right gear to keep you safe. Tough gloves will save your hands from scrapes, goggles will keep your eyes debris-free, and a hard hat is there just in case things overhead get a little too close for comfort.
Steady as You Go
When it comes to reaching those higher spots, a solid ladder or scaffolding is your best friend. Make sure they're on level ground and feel super sturdy before climbing up. No wobbling allowed!

Two Heads Are Better Than One
Don't fly solo with this one-grab a buddy. Having someone around is not just good for the company but also makes lifting and positioning way easier. Plus, it's essential for safety reasons because if something goes wrong, help is immediately at hand.
Know What's Below
The last thing you want is to dig into a surprise down below, like a water pipe or electrical line. A quick call to your local utility marking service can give you the all-clear so you can dig those post holes worry-free.
Keeping these pointers in mind will make sure you're off to a safe and sound start with your pergola setup. Safety may not be the most exciting part of DIY, but it's definitely the most important. Now that we've got that covered, let's get ready to build something great.
Step 1: Laying the Groundwork
Alright, let's roll up our sleeves and start prepping for your pergola. A bit of groundwork now means you'll be kicking back in the shade without a hitch when it's all done.
Choosing Your Spot
First, you need to find the right place in your yard. You want somewhere flat - no bumps or slopes here. Think about whether you want to bask in the sunshine or prefer a bit of shade. And don't forget to consider how much privacy you want from the neighbors, as well as how close you'd like your new chill spot to be to your house.
Playing by the Rules
Now's not the time for surprises. Check in with your local council or city office to see if you need a permit to build your pergola, or if there are any rules you need to follow. Trust me, a little bit of paperwork now can save you a big headache later on.
Gathering Your Gear
It's tool time! Make sure you have everything on hand before diving in. You'll likely need a shovel for hole digging, something to cart around dirt and concrete like a wheelbarrow, a drill for putting pieces together, and maybe a saw in case something needs a quick trim.
Getting these things sorted out now is like making sure you've packed snacks and tunes for a road trip - it just makes everything more enjoyable. With the prep work out of the way, we're ready to dig in and give your pergola a solid base to stand on.
Step 2: Building a Solid Base
Now that you've got the spot picked out and you're all clear on the rules, it's time to get down and dirty - literally. Setting up a strong foundation is crucial; think of it as the boots that will keep your pergola standing tall through rain or shine. Here's how to lay a sturdy base:
Marking Territory
Grab some stakes and string to mark out exactly where your pergola will go. This isn't just about looks; it's about making sure everything lines up right later on. Measure twice, so you only have to dig once.
Digging In
Time to break ground! Depending on the design of your pergola, you'll be digging holes for the posts. These need to be deep enough to hold the posts steady - usually about a third of the height of the post should be underground. Check local guidelines, too, because sometimes there are specific depths depending on frost lines.
Setting the Stage with Concrete
Once your holes are dug, it's concrete time. Mix it up according to the package instructions and pour it into the holes around the posts. You'll want to make sure those posts are standing super straight - use a level for this, and don't rush. It takes patience to get it just right.
Waiting Game
After pouring the concrete, you'll need to give it time to set. This can be the hard part because it's exciting to move forward, but good things come to those who wait. Following the concrete's recommended drying time ensures your pergola's base is as strong as possible.
With these steps, you've laid down a rock-solid foundation for your pergola. It's like setting up the perfect pair of boots for it to stand in - now it's ready to face whatever the weather throws at it. With the heavy lifting done, we can start focusing on getting the structure itself up and looking good.

Step 3: Putting Together the Frame
Alright, the base is rock-solid and now it's time to get this pergola looking like something you can show off. We're moving on to the frame - that means getting those beams and rafters up and in place.
Beams – Locking It In
Think of your beams as the broad shoulders of your pergola. You're going to secure them across the top of your posts. This is where your drill earns its keep. Bolt those beams down good and tight, and always keep that level close by to check that everything's straight. A wonky beam today means a lopsided pergola tomorrow.
Rafters – The Icing on the Cake
Time for the rafters – these are what give your pergola its iconic look, and make sure you'll be lounging in the shade instead of baking in the sun. Line them up according to the instructions that came with your pergola kit, then secure each one. And remember, safety first – keep that ladder steady and don't take any risks.
Give Everything a Wiggle
Now go back and give all those connections a once-over, tightening up anything that feels loose. Every bolt and screw counts here; they're what's keeping your pergola from turning into a pile of sticks at the next strong breeze.
There you have it – the framework of your pergola is standing tall! It's taking shape nicely, and you can almost see the end product. But before we start picking out curtains, there's still the matter of the roof. Let's keep the momentum going!
Step 4: Topping It Off with the Roof
We've done the heavy lifting-now it's time for the grand finale: the roof. It's what stands between you and the blazing sun or a surprise shower during your backyard chill sessions.

Pick Your Style
Aluminum panels are sleek and they last ages, but maybe you want something lighter like a shade cloth? Whatever floats your boat-just make sure it'll stand up to the weather and fits the look you're going for.
Piece by Piece
Before you climb up, spread out all the pieces on the ground. Get a good look at how they fit together-it's way easier to shuffle things around down here than when you're up high with a drill in hand.
Lock and Load
Grab that instruction sheet and start from one end, securing each section of roof as you go. Tighten every screw and align every edge. You want this roof to be watertight and smooth.
Keep It Cool and Dry
Quick check-are there gaps for air to get through? Is there a slight tilt for rainwater to run off? Good ventilation stops a scorcher underneath, and a bit of a slope means no puddles on top.
Step 5: Making It Yours
Almost there! Now come the bits that turn this structure into your favorite hangout spot.
Dress It Up
Time to get creative. String up some fairy lights, dangle a few potted plants, or train a vine up the side. These touches make it more than just a pergola; they make it your retreat.
A Coat for All Seasons
If your aluminum isn't already weatherproofed, a lick of paint or sealant could be a smart move. It'll keep everything spick-and-span through sun, rain, and whatever else the skies throw at it.
Stay Clean, Stay Classy
Draw up a simple cleaning schedule. A regular sweep and a wipe-down can stop nature from taking over. Keep it clean, and your pergola will always be ready for company.
The Final Touch: Enjoy Your Creation
There you have it-you've built more than just a structure; you've crafted an escape in your own backyard. Let's do a quick recap:
- Safety was first. We picked our spot with care.
- We dug in deep and gave it a solid base.
- The frame and rafters went up, then came the roof.
- And finally, we added those special personal details and thought about upkeep.
Building it was half the journey. The rest? That's all about kicking back and loving your new slice of the great outdoors. So, call up your pals, light up the BBQ, and bask in the awesomeness of your new pergola. Cheers to many sunny days and cozy nights ahead!
60 comments
Rojoda417
Assembly Manual FOUND…
THEY WERE HIDING IN BOX #1 the instructions on the internet are not complete and it’s frustrating trying to get them on the actual Purple Leaf website, someone in the comments mentioned to check box 1 and there they were if I could attach then to this comment page I would do so…
Alyssa Mendola
No instructions! I cannot find it online anywhere either. I need it for the 11×28 louvered pergola.
Chris Abbey
Just ordered a PLeaf 10′ × 14′ louvered pergola and need instruction manual. please email ASAP. You really should add documents to your website so they are readily available for download.
Thomas
Your web site is imposable to find an install video on
dennis J hadac
Yay! we purchased the 14’ by 20’ pergola. The assembly manual was [logically] in box one!
i need manual please
I don’t see the manuel anybody has a manuel 10×14 pergola
Brittany
I need 11×13 pergola instructions immediately.
Brittany
I need 11×13 pergola instructions immediately.
Mikw
No Assembly instruction for 11 by 21 Pergola
MARTIN ZAVALA
Wtf! No instructions. It’s Saturday and i have everything laid out.. I emailed you already 1 hour ago and no response.
Bruce Coffman
Who the fuck sells you a kit with no assembly instructions! So frustrating feel like just returning the thing what an asshole company 🖕🏻
Bryce
Why don’t you guys just put the instructions on here or in the box? Or send them in our purchase receipt email? You know, so we’re not sitting here ready to assemble with no instructions, which is very annoying when you’ve gotten other people to fit it in their schedule to come help.
JSC
Please email assembly instructions for
8 ft. × 14 ft. Gray Aluminum Outdoor Louvered Pergola with Individual Adjustable Sunshade Roofs and LED Lights
SKU 1015505298
V o
Can you email me the Manuel instructions for Athena pergola 12×24
V o
Can you email me the Manuel instructions for Athena pergola 12×24
Marco Sosa
Please email assembly instructions for the louvered pergola 14′ × 24′ outdoor aluminum with hidden drainage system and adjustable roof patio hardtop oversized Pergolas.
Cindy Wells
Instructions for assembly for a 13 × 30 louvered pergola please.
jason
Another one delivered with no assembly instructions. purchased a 12 × 24. I have help today but can not move forward. No help line phone number. I found through thdstatic.com an assembly instruction for another size. I am hoping this will give me enough information to move forward with my install.
matt mcdonald
Instructions for 13×30 please
J Franco
Could you please send me the installation guide for the Purple Leaf 11′ × 15′ louvered awning?
Paul Zaragoza
Please email the PDF installation instructions for the 10′×12′ louvered pergola. Thank you.
Larry
Where can I get the assembly instructions for my 10 X 16 Purple Leaf adjustable louvered pergola?
Paul Lopez
Just spent 20 minutes looking for the Installation instructions manual.
I have 10 large boxes and it wasn’t in Box 1 of 10 like a rational person would imagine. Opened a few other boxes but not seeing it. Where’s Waldo?
Kelvin
We do pergola installation
81854641579
Southern California
Terrell Coe
Please email instructions for 12X16 Athena louvered aluminum pergola ASAP.
Thank you.
Richard Tomlinson
I HAVE OPENED ALL OF THE 7 BOXES… AND NO INSTRUCTIONS/ ASSEMBLE MANUAL…. How can I assemble this without the INSTRUCTIONS manual?
JOHN
NOT DIRECTIONS, CAN YOU BE THAT STUPID!!!12 x21 pergola
Chris Arrasmith
Like everyone else no instructions, how disappointing.
John Sambuco
Wow, how many don’t get instructions? Same here. You should post here to avoid so many comments!
Adam Delu
Please provide a PDF file for the instructions, which we cannot find. This should not be so hard.
Aaron
Regarding the Assembly Instructions. Bought a 14′×10′…found the booklet under the center beams in box 4/6. Try unpacking all your boxes. Alternatively, search “thdstatic purple leaf pergola instructions”. Happy Building!
Jones
Please send me instructions for the 12′×20′ Louvered Pergola.
.
Can I have the instructions for the louvered pergola 11×28 please? Why didn’t it come with instructions?
juan
need instruction manuel for the 14×20 olive red pergola asap pls
Todd M. Bloomer
Can you please email me a PDF instruction booklet for the 11′ × 28′ Pergola. I would like to read the instructions ahead of time so that the instillation goes smoothly. Plus, with all the comments of not getting instructions when product has arrived. Thank you in advance.
Todd M. Bloomer
Dale Johnson
Same issue, cannot find assembly instructions for my 11×18 Pergola either
gean
I received NO assembly instructions for my 10×16 pergola. It appears this is a common issue! PLEASE send me a link to the pdf assembly document as tis not on your website!
Anyone out there have an electronic manual they can send???
J Lee
Requesting assembly manual for 12 × 14′ louvered pergola. Checked all boxes after we couldn’t find it in Box #1. Reading requests before mine, it looks like I’m not the only one!
RT
The fact that this many people are asking for instructions should signal a major flaw in your delivery and customer service. Kudos for figuring out the manufacturing process… but WTF on setting your customers up for success?! I expect most of these people probably set aside an entire day at the end of a busy week, recruited 1-3 more people for help, opened all 12 boxes… and found nothing to guide them amidst 1,000 different parts in no discernible order.
Also, I need instructions too please.
Jesse Sparks
I will need a copy of the installation instructions for the 12′×16′ Louvered Pergola.
Ivan
July 10, 2025 at 05:54p.m.
Can you please mail me instructions to assemble a purple leaf 12×16 pergola louvered a.s.a.p please .
How deep does my concrete base need to be?
Kalyani
can you please email me instructions to the 12 × 14 louvered pergola. This is ridiculous!
Cori Endrody
Please send instruction to construction your 12 × 20 louvered pergola. $5,000 and no instructions?
Kelly Sherman
Instructions for 12×14 pergola with louvered hard top. Please email kellysher@gmail.com
Not sure why there aren’t instructions included?
Celine Lewitt
Hello,
We purchased our Pergola from Home Depot. and would like to get assembly instruction for the 11.7ft x18.2ft. Pergola and if you have a video on how to built it that would be great too! Thank you.
model# PPL03KSBY1118-PG1
Erin Keller
Please email me instructions for the 12×14 louvered pergola. I bought this off amazon, because it was cheaper than buying it directly from your site (no idea why)
Nicolas Orellana
I need assembly instructions
Please email me the instructions as soon as possible
Neo K
Hello,
I recently purchase of 13×15 pergola and I request a copy of the assembly manual for the same.
Can you please email me a copy of instructions.
Thank you
Jennifer Fields
I see that I am not the only one that didn’t get the manual of instructions. How do you deliver such a product and not put instructions inside. Mind you if I put this up wrong and it hurts someone I guess this company doesn’t care. Then the best part is that there is a help assemble part of this company that you can pay into, over a $1,000 later. This seems like such a scam. As this company doesn’t send instructions, as I see that is all over the place in comments, then chargers you a lot of money for them to install. Then when I email customer service about this they give a fake phone number back to call for help about situation.
Annie Perkins
Can you e-mail me 12×14 purple leaf pergola instructions to install.