Gardeners often lament the arrival of frost, seeing it as the end of the growing season. However, an existing outdoor gazebo offers a robust framework that can be utilized to extend plant life well into the winter. By enclosing this structure, homeowners can create a microclimate suitable for overwintering tender perennials or starting seeds early in the spring. This conversion requires careful planning regarding insulation, light transmission, and temperature control. With the right materials and methods, a standard gazebo becomes a productive horticultural asset without requiring a permanent construction project.
Evaluate the Gazebo Structure
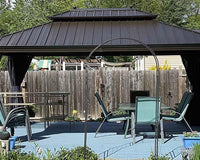
Before purchasing any materials, one must determine if the gazebo can withstand the added stress of a greenhouse conversion. A greenhouse enclosure acts like a sail in the wind and can catch significant snow loads. Metal-framed gazebos with hard tops are generally the best candidates because they can support the weight of snow and resist wind pressure.
Soft-top gazebos require more caution. If the fabric top is left on, it must be strong enough to handle snow accumulation, as the heat from inside will cause melting and refreezing, potentially creating ice dams. If the fabric top is removed to be replaced by plastic, the frame must be rigid enough to not twist. Inspect all bolts, anchors, and joints. Tighten any loose connections and ensure the structure is firmly anchored to the ground or patio to prevent tipping during winter storms.
Choose the Right Covering Material
The success of the greenhouse depends entirely on the "skin" applied to the frame. While standard construction plastic (painters' plastic) is cheap, it is not suitable for this project. It lacks UV stabilization and will degrade, turn brittle, and fall apart within a few months of sun exposure.
6-Mil Greenhouse Film:
This is the industry standard for temporary greenhouses. It is treated to resist UV degradation and is thick enough to retain heat while allowing adequate light transmission. It typically lasts up to four years, meaning it can be reused for several seasons.
Clear Vinyl Tarps:
For a more polished look, heavy-duty clear vinyl tarps with grommets can be used. These are thicker and more durable than film but are significantly more expensive. They offer excellent wind resistance and are easy to hang using zip ties or bungee cords.
Polycarbonate Sheets:
If the gazebo has built-in channels or a wooden frame, twin-wall polycarbonate sheets offer superior insulation. However, these are rigid and harder to install on a temporary basis compared to flexible films.
Create a Framing System for Attachment
Attaching plastic film directly to a metal gazebo frame can be challenging without damaging the finish. A practical solution involves creating a temporary wooden sub-frame or using non-invasive clamps.
Utilizing Snap Clamps
For tubular metal frames, PVC snap clamps are invaluable. These C-shaped plastic clips snap over the film and onto the pipe, holding the plastic taut without adhesives or screws. One must measure the diameter of the gazebo legs accurately to buy the correct size clamp.
Building a Wooden Sub-frame
If the gazebo posts are square or irregular, furring strips (thin strips of wood) can be attached to the posts using heavy-duty zip ties. The greenhouse plastic can then be stapled to these wooden strips. This method prevents damage to the metal frame and allows for a tighter seal, as wood is easier to work with when securing loose edges.
Seal the Enclosure Effectively
A greenhouse is only effective if it retains heat. Gaps are the enemy of thermal efficiency. The primary area of concern is usually where the walls meet the roof and where the walls meet the ground.
The Roof Connection:
Air rises, so heat will escape quickly through the top. If the gazebo has a vented roof, this vent needs to be sealed during the coldest months or equipped with an automatic opener. Use weather stripping tape or foam pipe insulation to close gaps between the plastic walls and the roofline.
The Ground Skirt:
Cold air sinks and will rush in from the bottom. When cutting the plastic, leave an extra 12 to 18 inches of material at the bottom. This excess should be weighed down with sandbags, bricks, or heavy lumber. This creates a "skirt" that prevents drafts and anchors the plastic against wind.
Doorway Sealing:
Creating an entry is necessary but creates a vulnerability. A simple overlap door, where two sheets of plastic overlap by two feet, is often sufficient. Magnetic screen door kits can also be adapted by taping plastic over the mesh, providing a self-closing entry system.
Manage Internal Temperature
A temporary greenhouse captures solar energy, but it has very little thermal mass to store it. This means it will get very hot during sunny days and freeze quickly at night. Temperature regulation is essential for plant survival.
Passive Heating Methods
To smooth out temperature swings, thermal mass should be introduced. Large black buckets or barrels filled with water absorb heat during the day and release it slowly at night. Placing these water containers along the north wall of the gazebo maximizes sun exposure and helps keep the nightly low temperature a few degrees higher.
Supplemental Heating
In freezing climates, passive heat is rarely enough for tender plants. A thermostatically controlled electric space heater is often necessary. An oil-filled radiator is a safe choice for damp environments as it has no exposed element to cause a fire. It provides a steady, gentle heat. Ensure any extension cords used are rated for outdoor use and moisture.
Optimize Ventilation and Airflow
It seems counterintuitive, but overheating is a major risk even in winter. On a bright, sunny day with an outdoor temperature of 40°F, the interior of a sealed greenhouse can easily exceed 90°F, which can stress or kill dormant plants.
Install Adjustable Vents:
Cuts can be made in the plastic near the roof peak and taped with reinforcement to create flaps. These can be opened on sunny days to let hot air escape.
Use Circulating Fans:
Stagnant air promotes fungal diseases like powdery mildew and botrytis. A small oscillating fan should run continuously to keep air moving. This strengthens plant stems and prevents cold pockets from forming in corners.
Monitor Humidity:
Condensation will form on the plastic walls. While high humidity is good for some plants, dripping water can cause rot. If the walls are constantly dripping, increase ventilation slightly to exchange the moist air for drier outside air.
Organize the Interior for Success
Once the structure is enclosed and the environment is controlled, the layout of the interior dictates how many plants can be stored. The floor is the coldest part of the greenhouse, so plants should not sit directly on the ground.
Tables, benches, or shelves should be used to elevate pots into the warmer air. Slatted shelves are preferred as they allow for better air circulation around the pots and let water drain freely. If plants must go on the floor, place them on pallets or Styrofoam boards to provide a thermal break from the cold patio or earth.
Organize plants by hardiness. Place the most cold-tolerant species near the walls and the door. The most tender plants should go in the center of the gazebo and ideally near the heater or thermal water barrels.
Conclusion
Converting a gazebo into a greenhouse can help utilize other benefits provided by outdoor furniture pieces, even when it’s not summer anymore. It’s like providing a haven for plants; with this structure, people with gardening interests can still pursue their hobby even when it’s winter outside because it serves as their sanctuary for plants while waiting for spring to arrive. Although it requires more effort with sealing drafts and using UV plastic materials, building a greenhouse inside a gazebo only requires a small amount of money compared to permanent glasshouse.
FAQ
Will a temporary greenhouse kill the grass under the gazebo?
Well, yes, if it’s going to sit on grass, foot traffic patterns combined with little airflow and the floor covering (if used) will permanently damage your grass or kill it off altogether. It’s much preferable to set these kinds of structures on top of patios or decking, or gravel pedestals. Grass can just be reseeded every spring if it’s going to sit on grass.
How much does it cost to heat a gazebo greenhouse?
It can cost anything depending on how much electricity rates are in your local area, how cold your winters are on average, and how well insulated it is. Being that it’s only insulated with one sheet of plastic, your electric heating unit will need to run constantly. To cut costs, install a “thermo-cube” power outlet that activates only when it’s close to freezing temperature instead of heating 24/7. Bubble wrap can be attached inside your plastic sheet to double-insulate it and minimize heat loss.
Can I use a patio heater inside the enclosed gazebo?
Propane patio heaters are generally not recommended for small, enclosed plastic greenhouses due to the risk of carbon monoxide buildup and ethylene gas production. Ethylene is a byproduct of combustion that can damage or kill plants even in small concentrations. If a propane heater is used, adequate ventilation is mandatory, which defeats the purpose of sealing the gazebo for warmth. Electric oil-filled radiators are the safest option.